ThinLinc 4.21.0 introduced native OpenID Connect (OIDC) authentication for ThinLinc Web Access. This allows you to connect ThinLinc to identity providers such as Microsoft Entra ID and let users authenticate with their organizational Microsoft accounts.
Instead of maintaining another set of passwords specifically for remote Linux desktops, you can use your existing Microsoft Entra authentication policies, including multifactor authentication (MFA) and Conditional Access.
This tutorial explains how to configure Microsoft Entra ID as an OIDC identity provider for ThinLinc Web Access.
Important: Native OIDC authentication requires ThinLinc 4.21.0 or later and currently applies to ThinLinc Web Access. It does not add OIDC authentication to the native ThinLinc Client. For native-client SSO, ThinLinc documents Kerberos as an option.
Prerequisites
-
Ubuntu Server 24.04 LTS (64-bit).
-
A root user or a non-root user with sudo privileges.
-
A public IPv4 address for the server.
-
A valid domain name pointed to your server IP. This tutorial uses thinlinc.linuxbuz.com.
-
Inbound TCP ports 80 and 443 available for the web endpoint, plus SSH port 22 for administration.
-
A Microsoft Entra tenant where you can create an App Registration and Enterprise Application configuration.
Part I - Install and Publish ThinLinc Web Access
Step 1 - Update Ubuntu 24.04
Start by updating the package index and installing current package updates. Run these commands with sudo:
sudo apt update
sudo apt upgrade -y
Install the extra packages required for ThinLinc:
sudo apt install -y wget unzip curl openssh-server dnsutils
Step 2 - Configure the Server Hostname
Set the fully qualified hostname to the domain that users will use for ThinLinc:
sudo hostnamectl set-hostname thinlinc.linuxbuz.com
Verify the setting:
hostnamectl
hostname -f
The expected fully qualified hostname is:
Step 3 - Create the ThinLinc Administrator User
Create a new non-root user that will be used for ThinLinc administration and login sessions:
sudo adduser thinadm
Add it to the sudo group:
sudo usermod -aG sudo thinadm
The source deployment adds ThinLinc paths to the sudo secure path. Edit the sudoers file with a safe editor:
sudo visudo
Find the Defaults secure_path line and include the ThinLinc paths:
Defaults secure_path="/usr/local/sbin:/usr/local/bin:/usr/sbin:/usr/bin:/sbin:/bin:/snap/bin:/opt/thinlinc/bin:/opt/thinlinc/sbin"
Switch to the new account and confirm sudo access:
su - thinadm
sudo -v
Step 4 - Download and Extract ThinLinc Server 4.21.0
Download ThinLinc Server 4.21.0 from the Cendio server download page or use the below command:
wget https://www.cendio.com/downloads/server/tl-4.21.0-server.zip
Extract the archive and enter the extracted directory:
unzip tl-4.21.0-server.zip
cd tl-4.21.0-server
Step 5 - Install and Configure ThinLinc Server 4.21.0
Run the installer as the thinadm administrator. The following sub-steps preserve the text-mode installer flow from the deployment transcript.
1. Start the ThinLinc server installer.
sudo ./install-server
2. Enter the thinadm sudo password. If GTK+ cannot start, the installer falls back to text mode.
[sudo] password for thinadm:
Could not start GTK+. Using text mode fallback...
ThinLinc server installation
This program will help you install the ThinLinc software on your system.
Before installing, see the platform specific notes at

Press Enter to continue...
3. Press Enter. ThinLinc detects the Ubuntu package that will be installed.
Determining packages to install... done.
The following packages will be installed:
thinlinc-server_4.21.0-4708_amd64.deb
Press Enter to continue...
4. Press Enter again to install the package.
Performing package installation... done.All packages were installed successfully.Press Enter to continue...Installation of ThinLinc completed!Before using ThinLinc, you must configure it using/opt/thinlinc/sbin/tl-setup.
5. Start ThinLinc Setup when prompted.
Run ThinLinc setup now [Yes/no]? Yes
Could not start GTK+. Using text mode fallback...
Welcome to ThinLinc server setup!
This program will configure ThinLinc to run on your system. It will also
verify that you have all required software installed.
Before continuing, ensure you have read the platform specific notes at
Press Enter to continue...
6. Press Enter, then accept the ThinLinc license agreement.
Do you accept the terms of the license agreement [yes/No]? yes
7. Configure this first server as the Master.
Server type
Select the type of ThinLinc server to configure.
The master server is the one users will connect to. Agent servers are
used to spread the resource load when just the master server is
insufficent. If unsure, then pick Master.

Server type [Master/agent]? Master
8. Allow the wizard to analyze the system.
System check
Analyzing system... done.
9. Install NFS client support automatically. This enables ThinLinc local drive redirection.
Network file system support
The local drive redirection feature requires that your system can act as
an NFS client.
The necessary packages can be installed automatically by this wizard, or
you can install them manually and restart the wizard.
Automatically install the necessary packages [Yes/no]? Yes
The following packages will be installed:
nfs-common
The following dependencies will be installed/updated:
keyutils
libnfsidmap1
rpcbind

Do you want to continue with installation [Yes/no]? Yes
10. Install the Python LDAP module when prompted.
Python dependency
The Python LDAP module is required for LDAP integration tools. Your
system does not have this installed.
The necessary packages can be installed automatically by this wizard, or
you can install them manually and restart the wizard.
Automatically install the necessary packages [Yes/no]? Yes
The following packages will be installed:
python3-ldap
Do you want to continue with installation [Yes/no]? Yes
11. Select the externally reachable hostname.
External connections
ThinLinc may not be externally accessible
In most cases, ThinLinc needs a hostname configured to be accessible
from an external network. This hostname must be reachable from all
client machines.
By default, the agent's IP address will be used. This IP will generally
only be reachable from within the local area network. Therefore, a
public hostname for the agent is recommended.
Externally reachable address to use
* IP address
* Hostname (thinlinc.linuxbuz.com)
* Manually specified
Externally reachable address to use [ip/hostname/manual]? hostname
12. Enter the administrator contact address used for ThinLinc administrative messages.
Administrator contact
ThinLinc will send administrative messages, for example license
warnings, to this email address. You can add multiple email addresses
separated by spaces.
Administrator email []? hitjethva@gmail.com
13. Decide whether to enable Web Administration. Enter a strong password if you want to use the admin interface on port 1010, or press Enter to skip it.
Web Administration
If you wish to enable Web Administration you must set a password. The
default Web Administration username is "admin".
The ThinLinc Web Administration is running on port 1010 (https) on this
server.
Leave the field blank and press Enter to skip this step.
Web Administration password?
14. Disable the optional printer queues if you do not need ThinLinc printer redirection.
Printers
ThinLinc includes special printer queues that allow users to use
printers locally attached to their client machine, as well as
automatically selecting the correct printer based on the users'
location.
Configure location-based printer queue (nearest) [Yes/no]? no
Configure client-side printer queue (thinlocal) [Yes/no]? no
15. Install the ThinLinc AppArmor configuration.
AppArmor
This system is using the AppArmor access control system. A ThinLinc
configuration needs to be loaded for some applications to operate
correctly in this environment. Would you like to install the ThinLinc
AppArmor configuration?

Install AppArmor configuration [Yes/no]? Yes
16. Allow setup to configure and start ThinLinc services and timers.
Configuring services and timers
Configuring and starting ThinLinc services and timers... done.
All ThinLinc services and timers have been configured and started
successfully.

Press Enter to continue...
17. Press Enter to finish the setup.
ThinLinc has been setup

The ThinLinc Web Administration is available at https://localhost:1010,
and the configuration files are located in /opt/thinlinc/etc/conf.d/.

Visit
 for information on how to
contact us.

Press Enter to continue...
18. If you did not launch tl-setup from install-server, you can run it later with this command.
sudo /opt/thinlinc/sbin/tl-setup
19. Finally, restart the server.
sudo reboot
Step 6 - Verify ThinLinc Services and the Public Agent Hostname
Check the core ThinLinc services:
sudo systemctl status vsmserver
sudo systemctl status vsmagent
sudo systemctl status tlwebaccess
If you enabled Web Administration, also check:
sudo systemctl status tlwebadm
Each enabled service should report Active: active (running).
Verify the public agent hostname selected during setup:
/opt/thinlinc/bin/tl-config /vsmagent/agent_hostname
Expected output:
thinlink.linuxbuz.com
If it is incorrect, set it explicitly and restart the agent:
sudo /opt/thinlinc/bin/tl-config /vsmagent/agent_hostname=thinlinc.linuxbuz.com
sudo systemctl restart vsmagent
Step 7 - Test ThinLinc Web Access on Port 300
ThinLinc Web Access listens on HTTPS port 300 by default. Test Web Access through the domain name: https://thinlinc.linuxbuz.com:300.
Deployment choice: The final public endpoint in this guide is https://thinlinc.linuxbuz.com without :300. Nginx will accept HTTPS on port 443 and proxy requests to ThinLinc on port 300.
Step 8 - Install and Configure Nginx as a ThinLinc Reverse Proxy
Install Nginx, enable it, and check its status:
sudo apt install -y nginx
sudo systemctl enable --now nginx
sudo systemctl status nginx
Create a dedicated Nginx site for ThinLinc:
sudo nano /etc/nginx/sites-available/thinlinc
Add the following initial HTTP configuration. Certbot will add HTTPS certificate settings later. The /connect/thinlinc.linuxbuz.com/ location is important because ThinLinc uses the agent hostname as the session-routing identifier.
server {
listen 80;
listen [::]:80;
server_name thinlinc.linuxbuz.com;

proxy_read_timeout 999h;

location / {
proxy_pass https://127.0.0.1:300/;
proxy_http_version 1.1;
proxy_set_header Upgrade $http_upgrade;
proxy_set_header Connection $http_connection;
proxy_set_header Host $host;
proxy_set_header X-Real-IP $remote_addr;
proxy_set_header X-Forwarded-For $proxy_add_x_forwarded_for;
proxy_set_header X-Forwarded-Proto $scheme;
}

location /connect/thinlinc.linuxbuz.com/ {
proxy_pass https://127.0.0.1:300/;
proxy_http_version 1.1;
proxy_set_header Upgrade $http_upgrade;
proxy_set_header Connection $http_connection;
proxy_set_header Host $host;
proxy_set_header X-Real-IP $remote_addr;
proxy_set_header X-Forwarded-For $proxy_add_x_forwarded_for;
proxy_set_header X-Forwarded-Proto $scheme;
}
}
Enable the site, remove the default site, then test and reload Nginx:
sudo ln -s /etc/nginx/sites-available/thinlinc /etc/nginx/sites-enabled/thinlinc
sudo rm -f /etc/nginx/sites-enabled/default
sudo nginx -t
sudo systemctl reload nginx
WebSockets: ThinLinc Web Access relies on WebSocket connections. The reverse-proxy configuration forwards the Upgrade and Connection headers and uses a long proxy_read_timeout.
Step 9 - Configure ThinLinc for the Reverse Proxy
Set the public Web Access login page to the external URL and mark only the local Nginx proxy as trusted:
sudo /opt/thinlinc/bin/tl-config /webaccess/login_page=https://thinlinc.linuxbuz.com/
sudo /opt/thinlinc/bin/tl-config /webaccess/trusted_proxies=127.0.0.1
sudo systemctl restart tlwebaccess
Security: Only list reverse proxies you control in /webaccess/trusted_proxies. Trusting arbitrary addresses can allow client-IP spoofing.
Step 10 - Configure the Ubuntu Firewall
If you use UFW, allow SSH, HTTP, and HTTPS, then review the rules:
sudo ufw allow OpenSSH
sudo ufw allow 80/tcp
sudo ufw allow 443/tcp
sudo ufw enable
sudo ufw status numbered
Port 300: When browser access is handled exclusively by Nginx, you normally do not need to expose ThinLinc Web Access port 300 to the public Internet. Keep it reachable only where your proxy design requires it.
Step 11 - Install a Let’s Encrypt TLS Certificate
Install Certbot and its Nginx plugin:
sudo apt install -y certbot python3-certbot-nginx
Request a certificate for the ThinLinc hostname:
sudo certbot --nginx -d thinlinc.linuxbuz.com
Follow the prompts to provide an email address, accept the Let’s Encrypt terms, and enable HTTPS redirection when offered. Then test renewal:
sudo certbot renew --dry-run
OIDC prerequisite: The Microsoft Entra OIDC configuration later in this tutorial uses https://thinlinc.linuxbuz.com/ as the public HTTPS address.
Step 12 - Verify ThinLinc Through thinlinc.linuxbuz.com
Confirm that the public endpoint responds over HTTPS:
curl -I https://thinlinc.linuxbuz.com/
Then open this address in a browser:
https://thinlinc.linuxbuz.com
You should see the ThinLinc Web Access login page without specifying port 300.
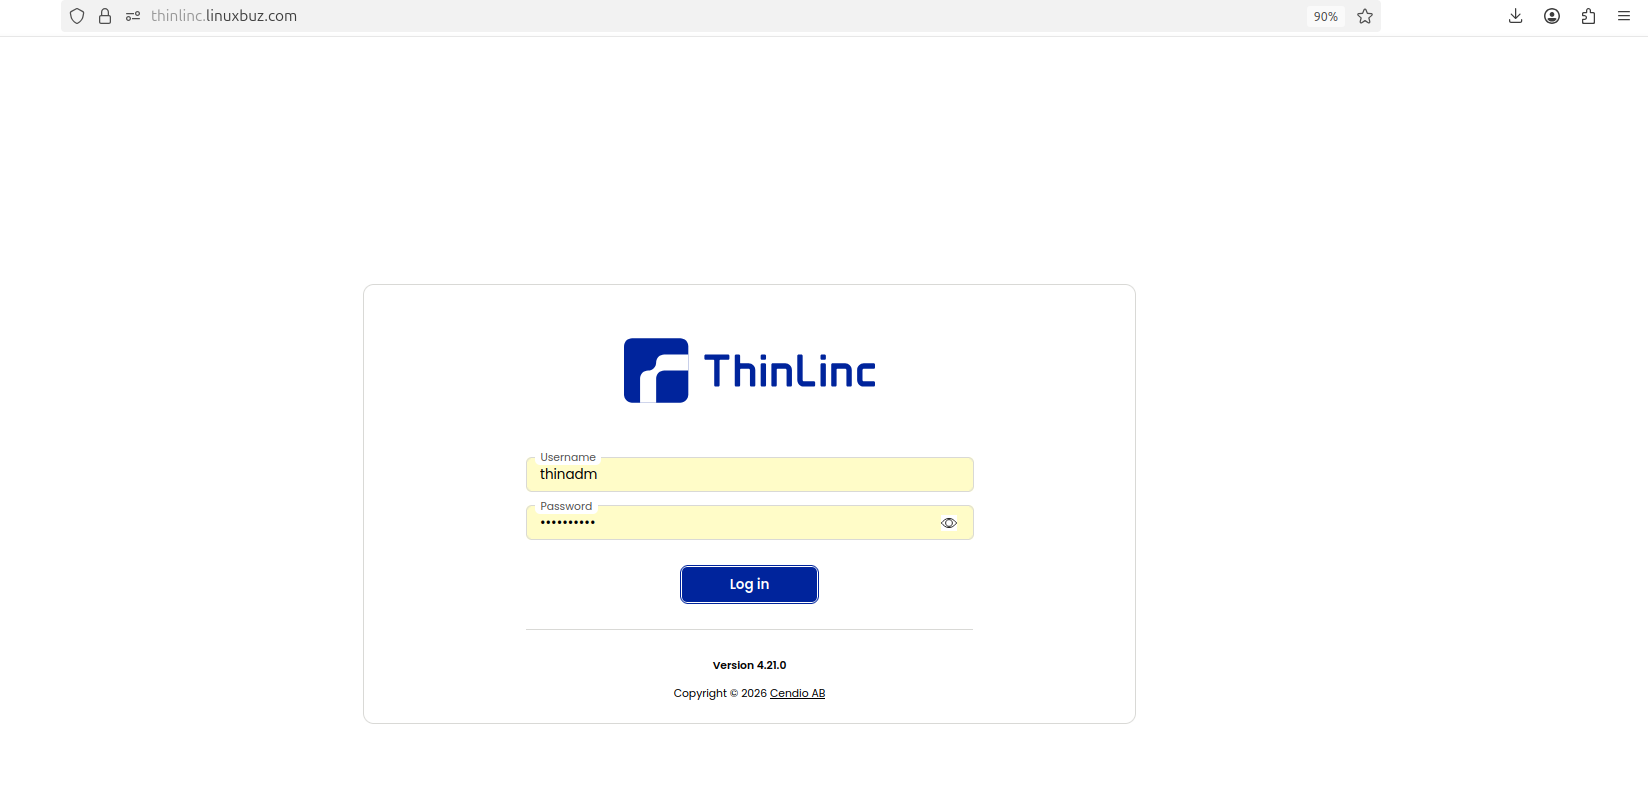
Provide your login credentials and click Log In. If the login page opens but a desktop session does not start, verify the WebSocket headers and the agent-specific proxy location:
/connect/thinlinc.linuxbuz.com/
For troubleshooting, monitor the ThinLinc and Nginx logs:
sudo tail -f /var/log/tlwebaccess.log
sudo journalctl -u tlwebaccess -f
sudo tail -f /var/log/nginx/error.log
Ready for Microsoft Entra: The server-side foundation is complete. Use https://thinlinc.linuxbuz.com/ as the public ThinLinc URL and as the Microsoft Entra Web redirect URI.
Part II - Configure Microsoft Entra ID OIDC Authentication
Step 13 - Verify the Existing Linux User
The Entra user eventually needs to map to an existing Linux account. On the ThinLinc server, run:
getent passwd thinadm
For this setup, the output is:
thinadm:x:1000:1000:,,,:/home/thinadm:/bin/bash
This confirms that thinadm can be resolved by the operating system. ThinLinc requires the OIDC username claim to exactly match a valid Linux username, or an alias that Linux can resolve. After external authentication, ThinLinc uses PAM for authorization.
Step 14 - Open Microsoft Entra Admin Center
Open the Microsoft Entra admin center: https://entra.microsoft.com/
Sign in to the Entra tenant where you want to register ThinLinc, then navigate to: Entra ID > App registrations
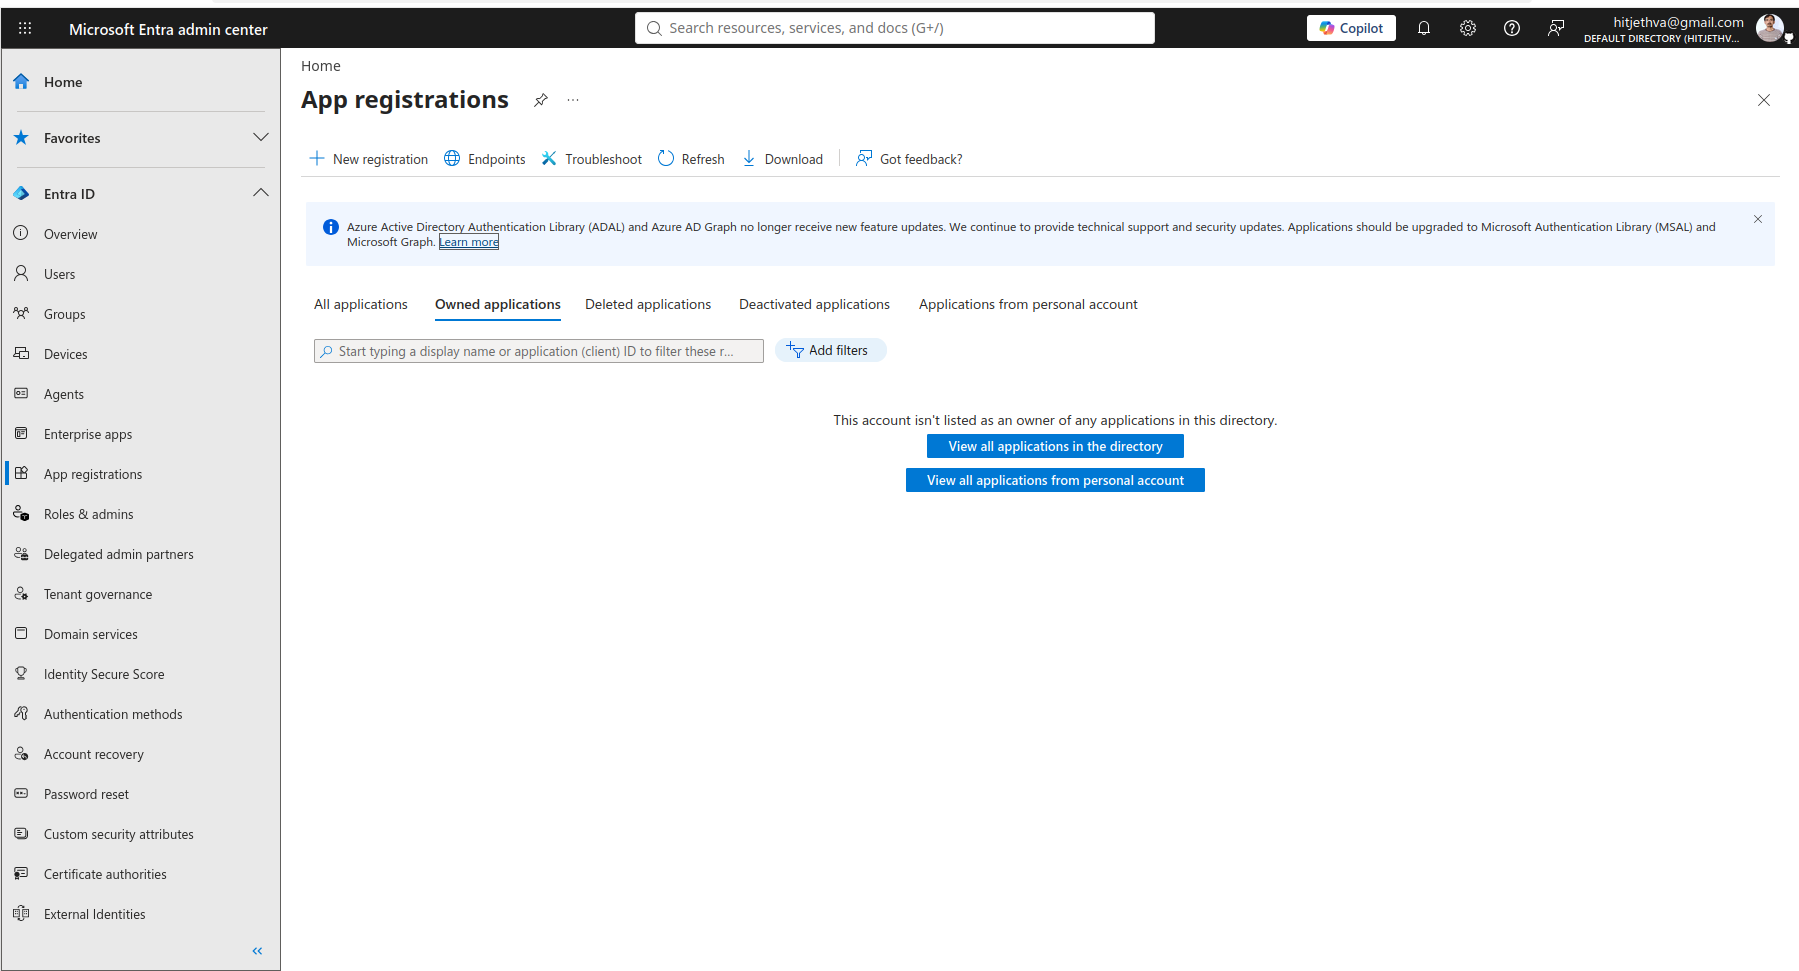
Then, click New registration
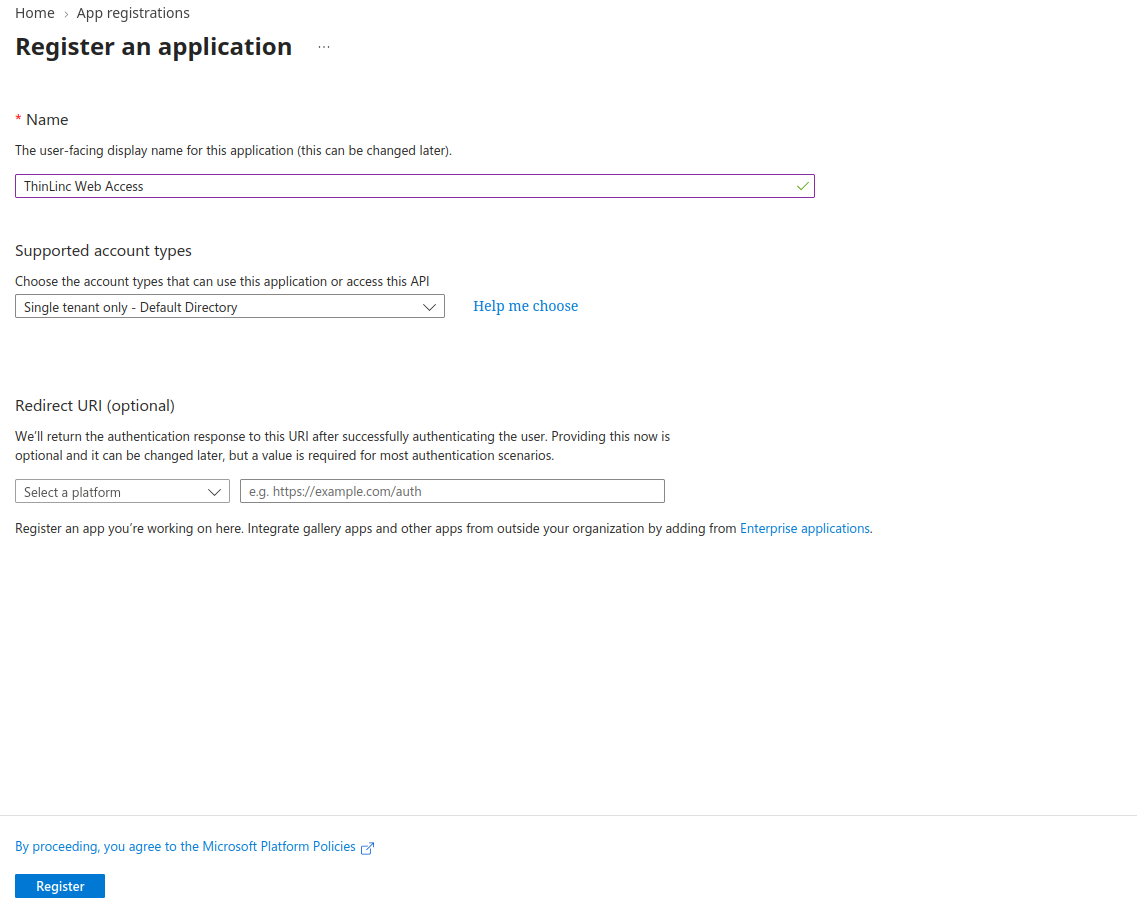
Enter all required details and click Register. This creates a single-tenant application. You can leave the redirect URI empty during initial registration and add it afterward. Click Register.
Step 15 - Record the Client ID and Tenant ID
After registration, Microsoft opens the application Overview page.
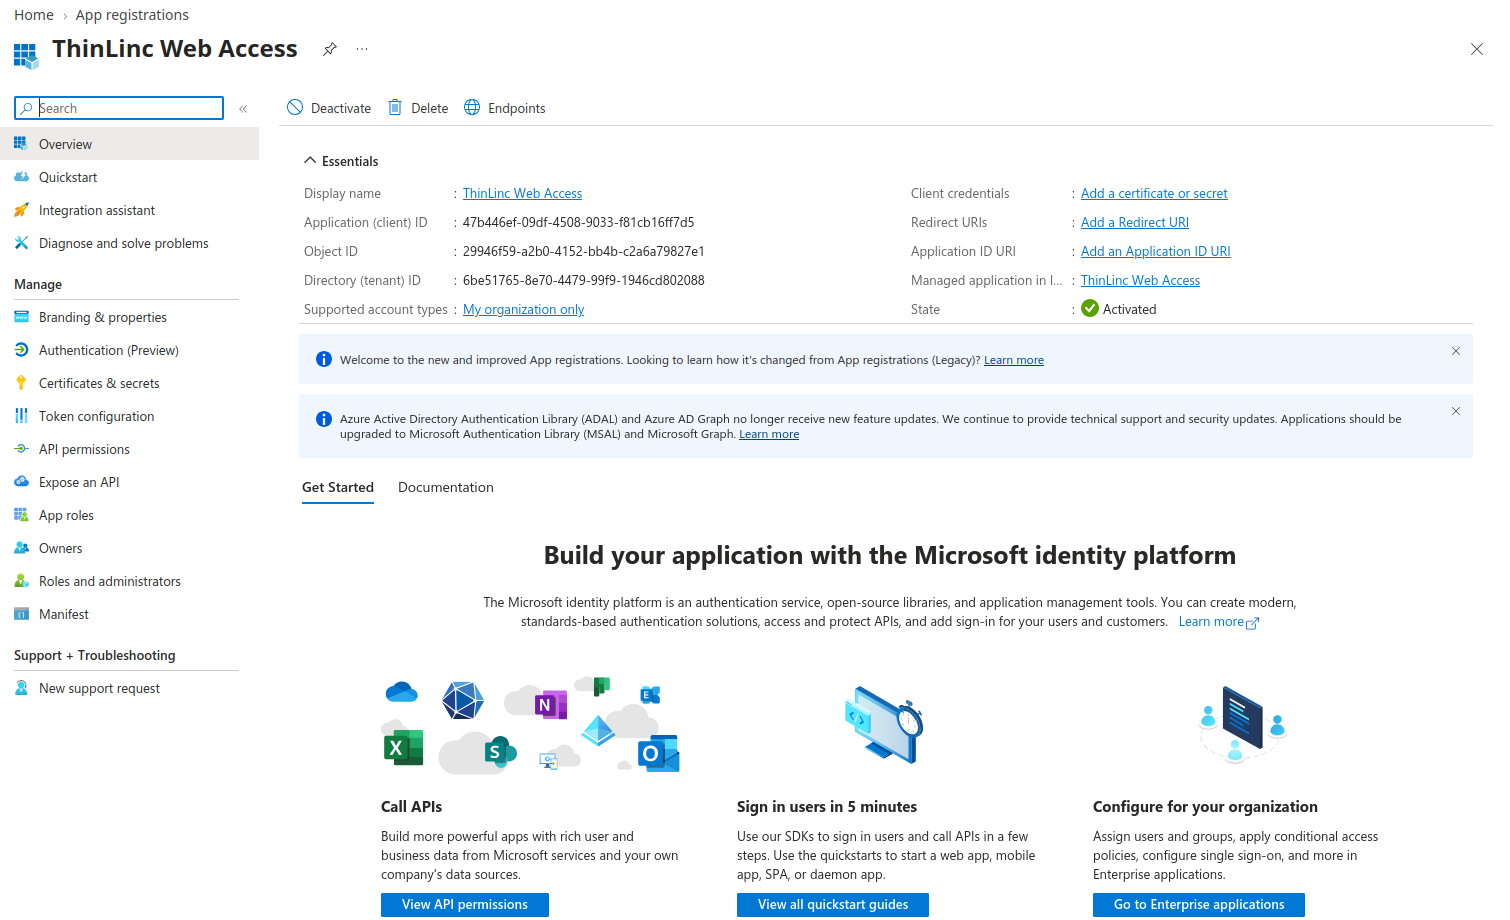
Record these values:
-
Application (client) ID
-
Directory (tenant) ID
The Application (client) ID is the OIDC client ID ThinLinc will use.
Step 16 - Configure the ThinLinc Redirect URI
In the App Registration, click Authentication. In Microsoft’s newer interface, this may appear as Authentication (Preview).
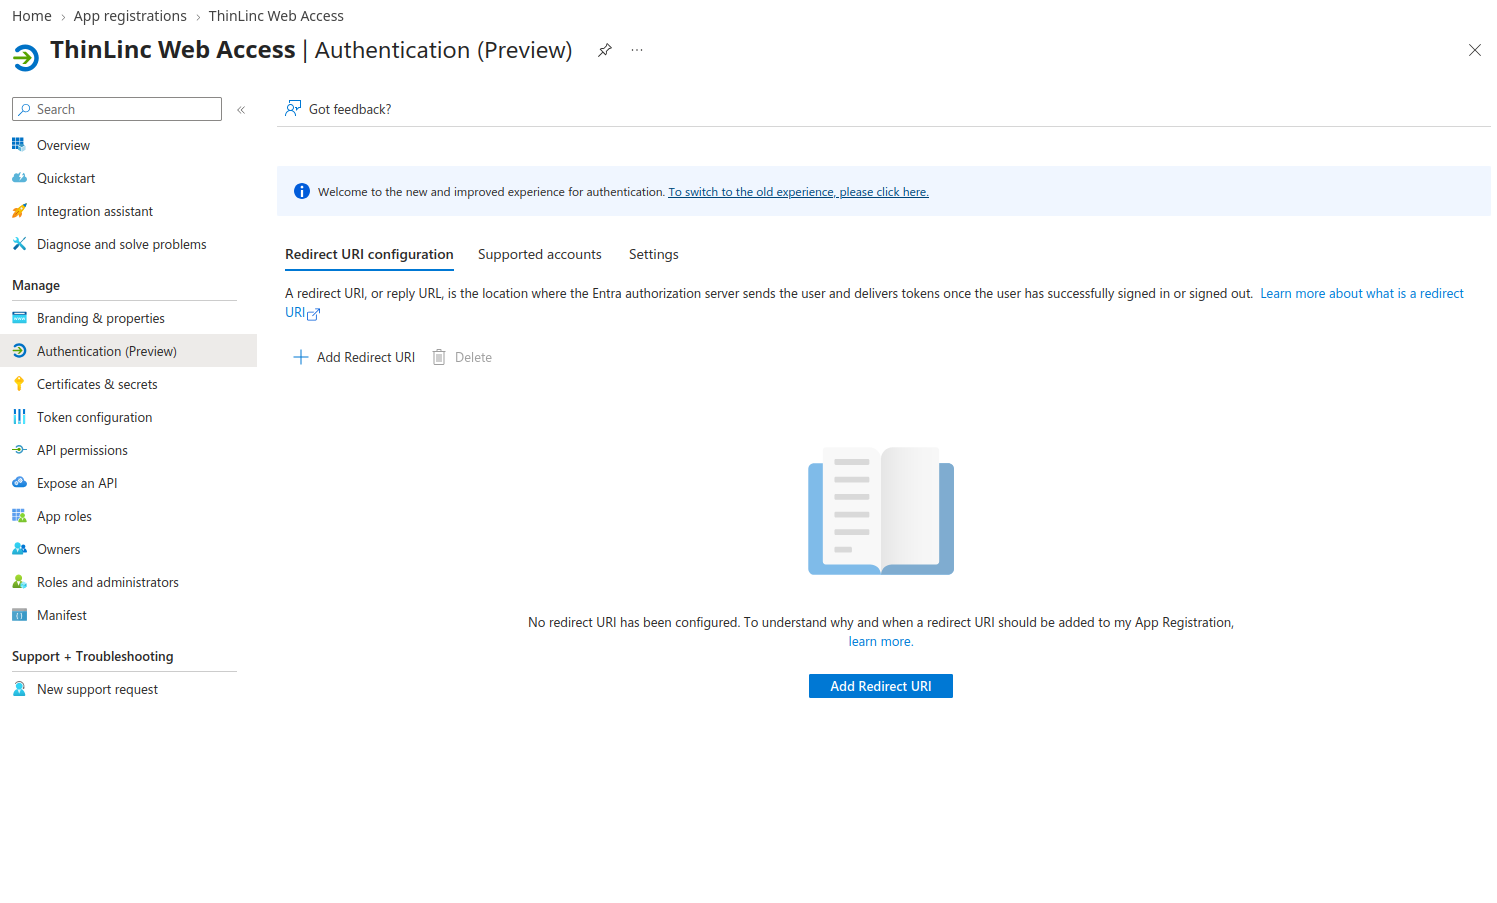
Click Add Redirect URI and select Web.
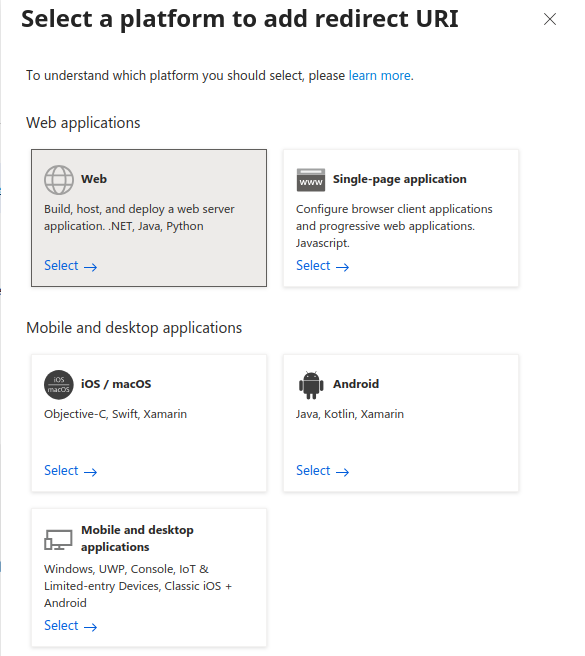
Provide the details below and click Configure.

Note: The ThinLinc OIDC redirect URI must use HTTPS, contain a trailing slash, and exactly match the URL users use for Web Access. Because this deployment uses a reverse proxy, use the public proxy URL.
Step 17 - Create the Microsoft Entra Client Secret
Return to the App Registration and open: Certificates & secrets > Client secrets > New client secret
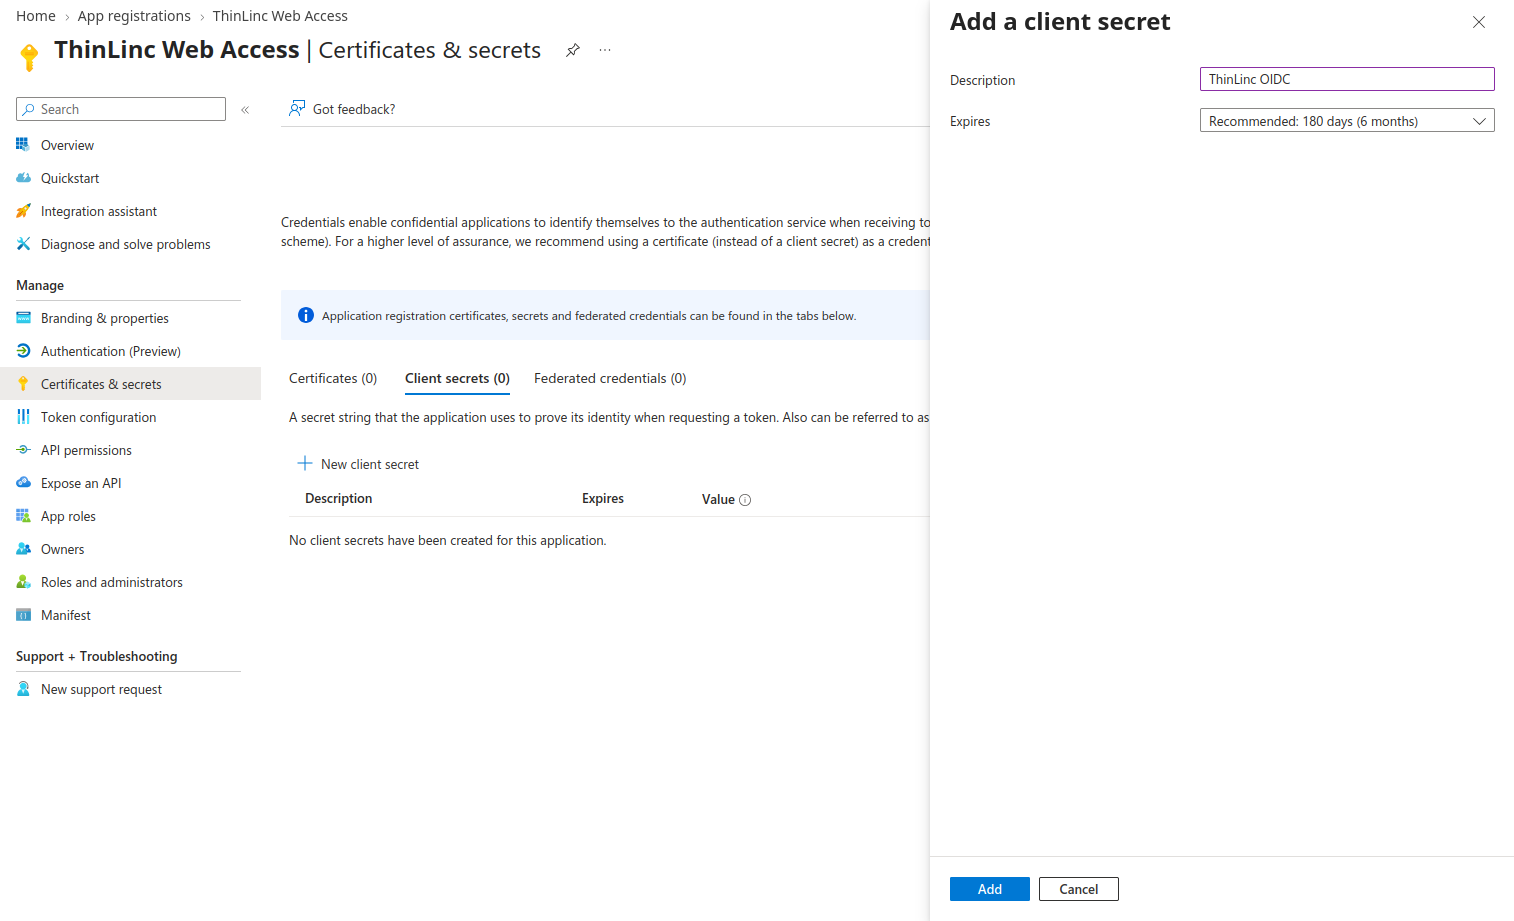
Enter a description such as:
ThinLinc OIDC
Select a suitable expiration period and click Add. Microsoft shows both a Value and a Secret ID. ThinLinc needs the Value, not the Secret ID.
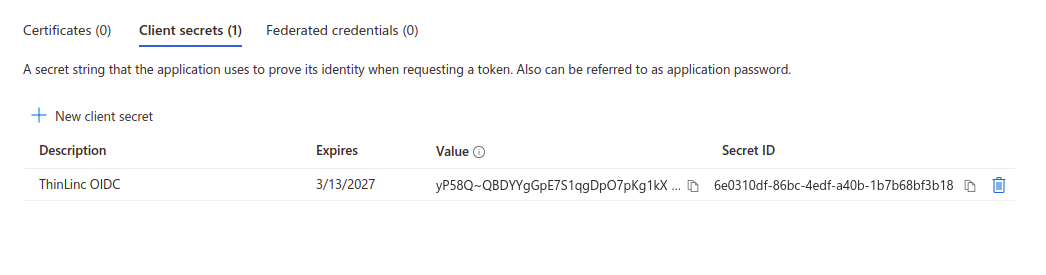
Security: Copy the client secret Value immediately and store it securely. If a secret has ever been pasted into chat, documentation, a ticket, or shell history, revoke it and create a new one.
Step 18 - Restrict the Enterprise Application
Because this example maps one Entra identity to the Linux account thinadm, restrict the Enterprise Application to the intended user.
Open Entra ID > Enterprise applications > ThinLinc Web Access > Properties
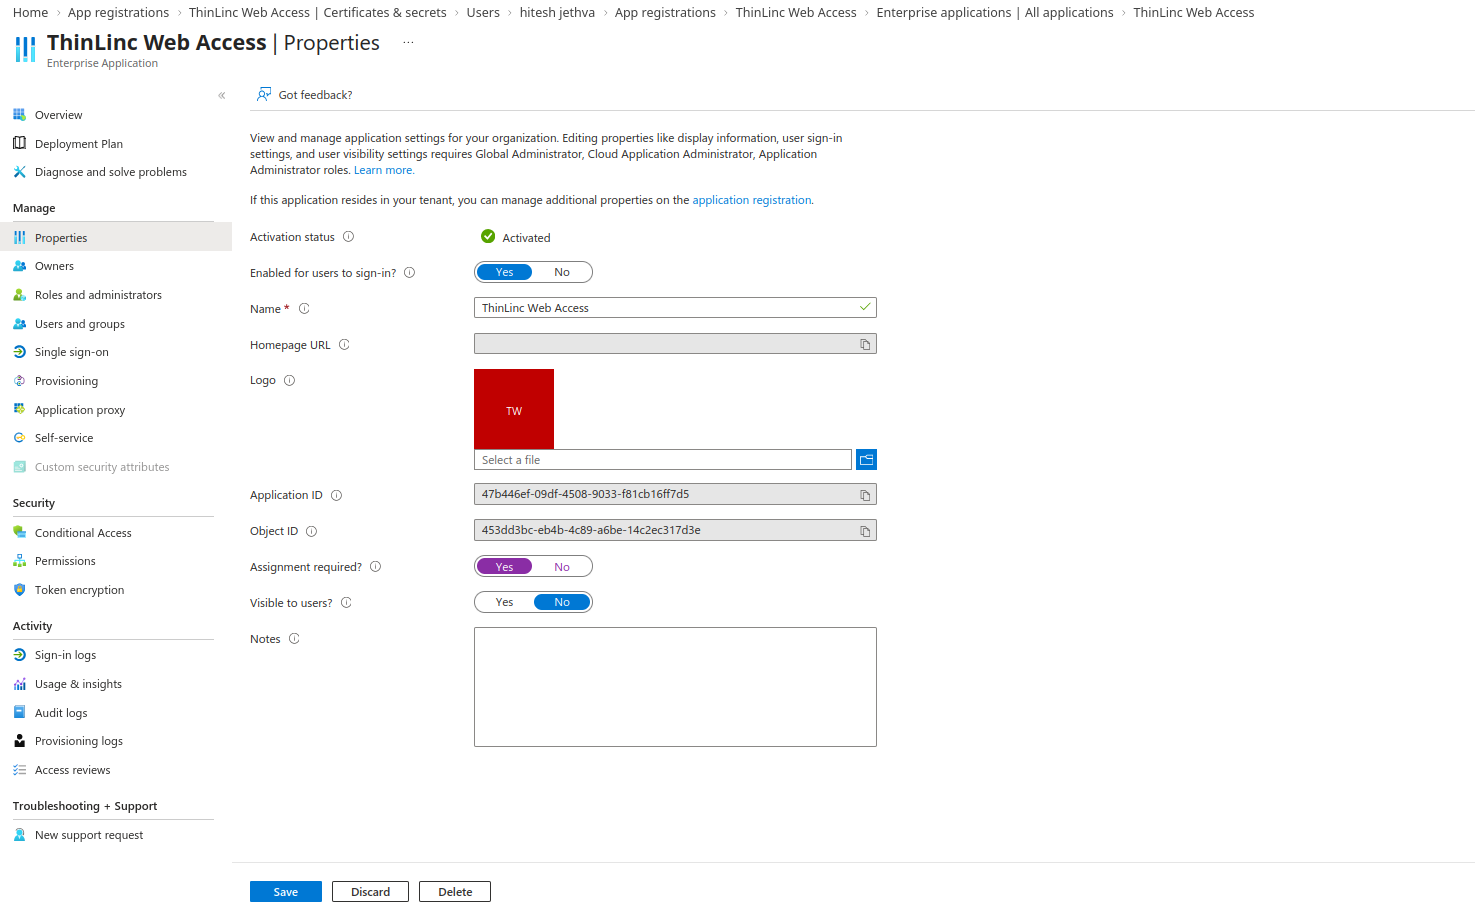
Set:
Assignment required? = Yes
Save the change. Then open: Users and groups > Add user/group
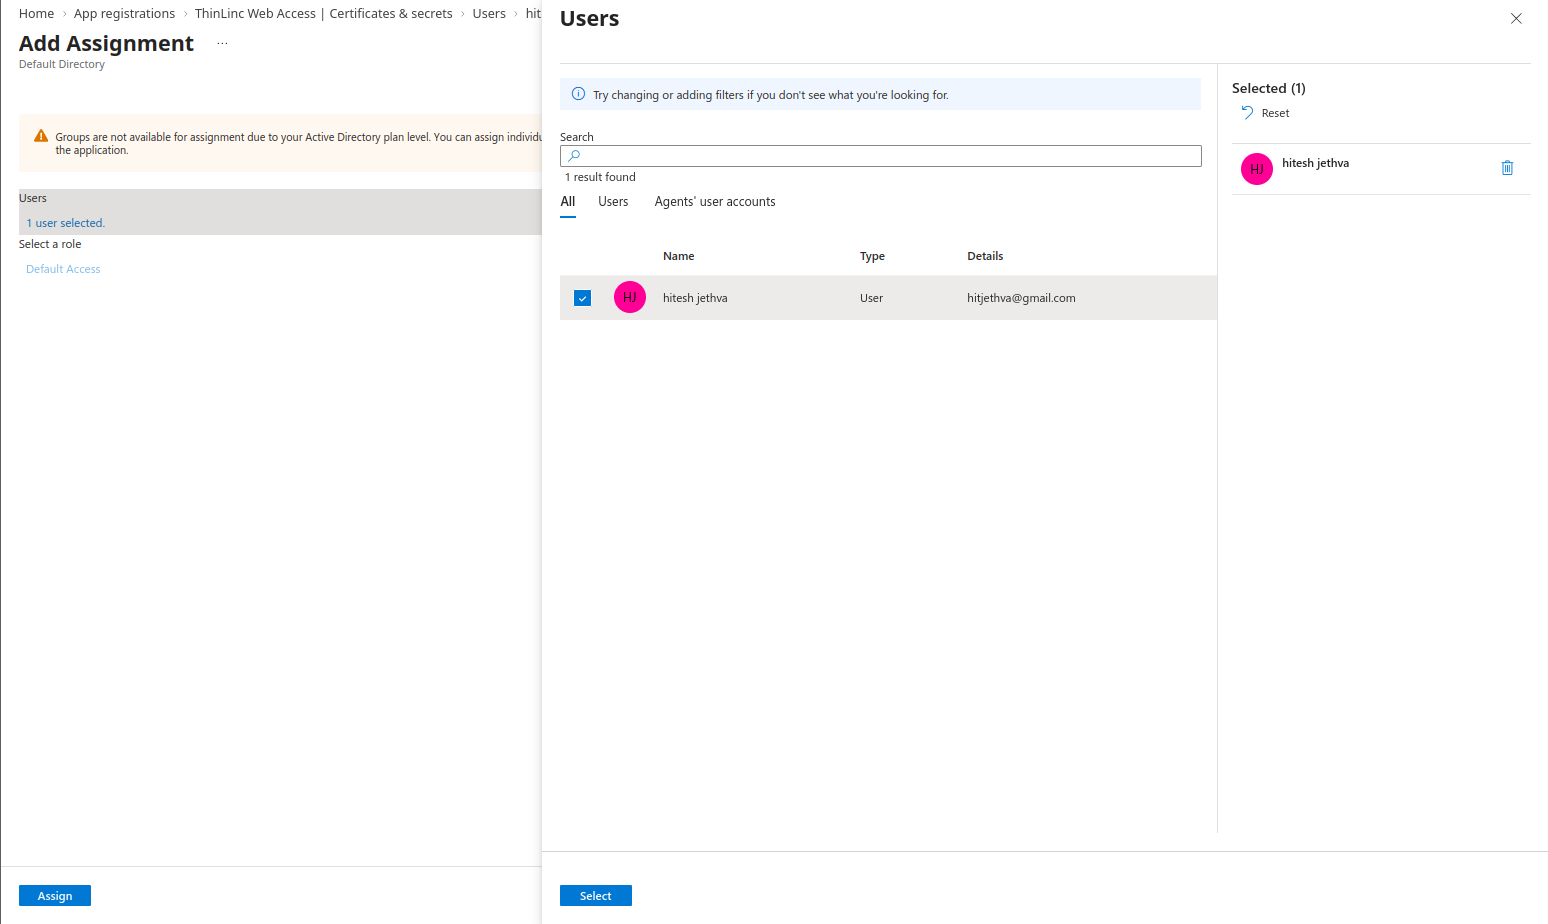
Select your account and click Assign. Assign only the Entra account that should be allowed to use the thinadm mapping. This prevents another tenant user from authenticating to the application and receiving the same Linux account mapping.
Step 19 - Understand Microsoft Entra User Mapping
A regular Microsoft Entra user typically signs in with a User Principal Name (UPN) such as:
user@gmail.com
However, this value may not match the Linux username used by ThinLinc. For example, the Microsoft Entra account might be:
user@gmail.com
while the Linux account is:
thinadm
If ThinLinc uses claims such as preferred_username or userPrincipalName directly, it may try to authenticate the user as user@gmail.com instead of thinadm.
To avoid this mismatch, configure a custom Entra claim such as:
linux_username = thinadm
Then configure ThinLinc to use:
username_claim=linux_username
This allows the Microsoft Entra user to authenticate with their normal Microsoft account while ThinLinc maps the login to the correct existing Linux user.
Step 20 - Create the linux_username JWT Claim
Open: Entra ID > Enterprise applications > ThinLinc Web Access > Single sign-on > Attributes & Claims > Edit
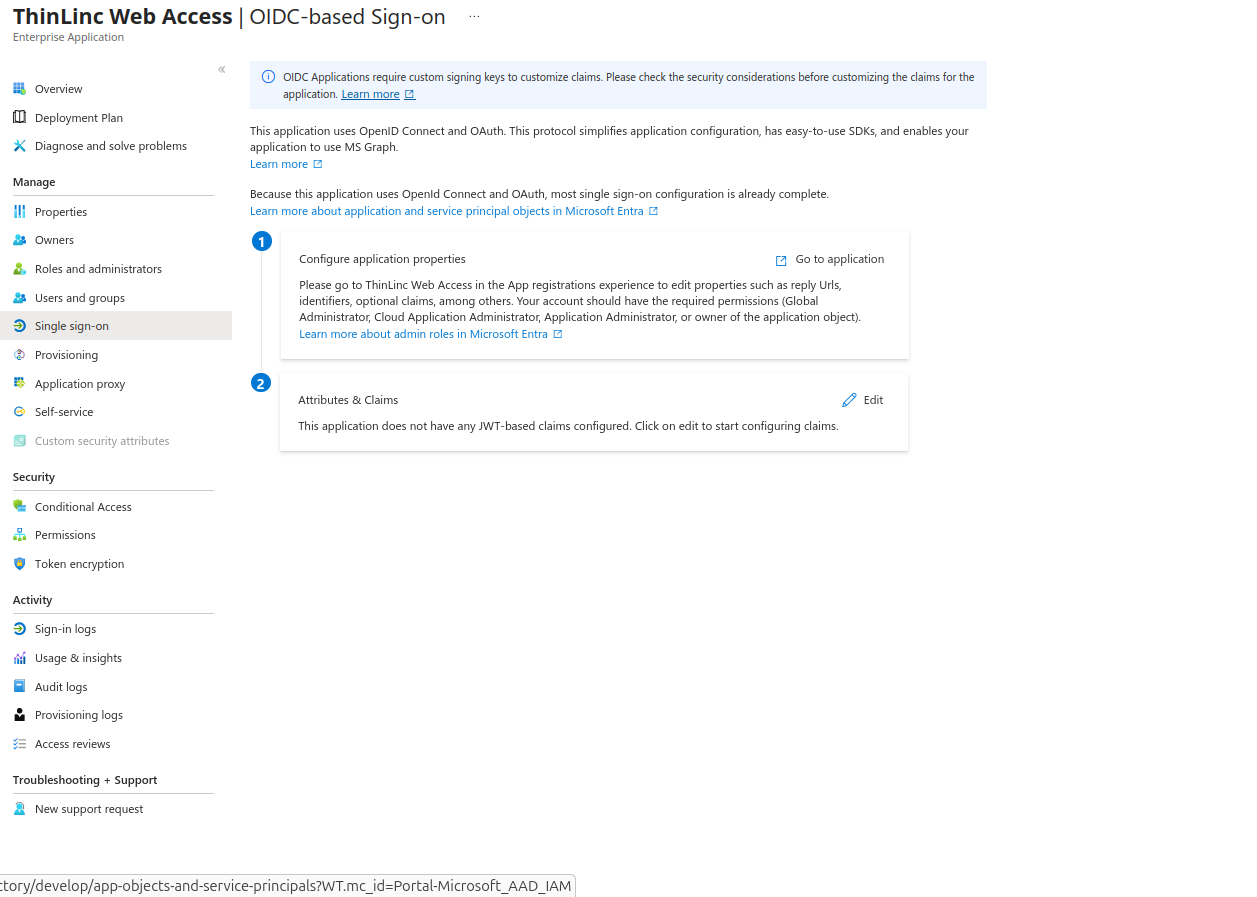
Click Add new claim
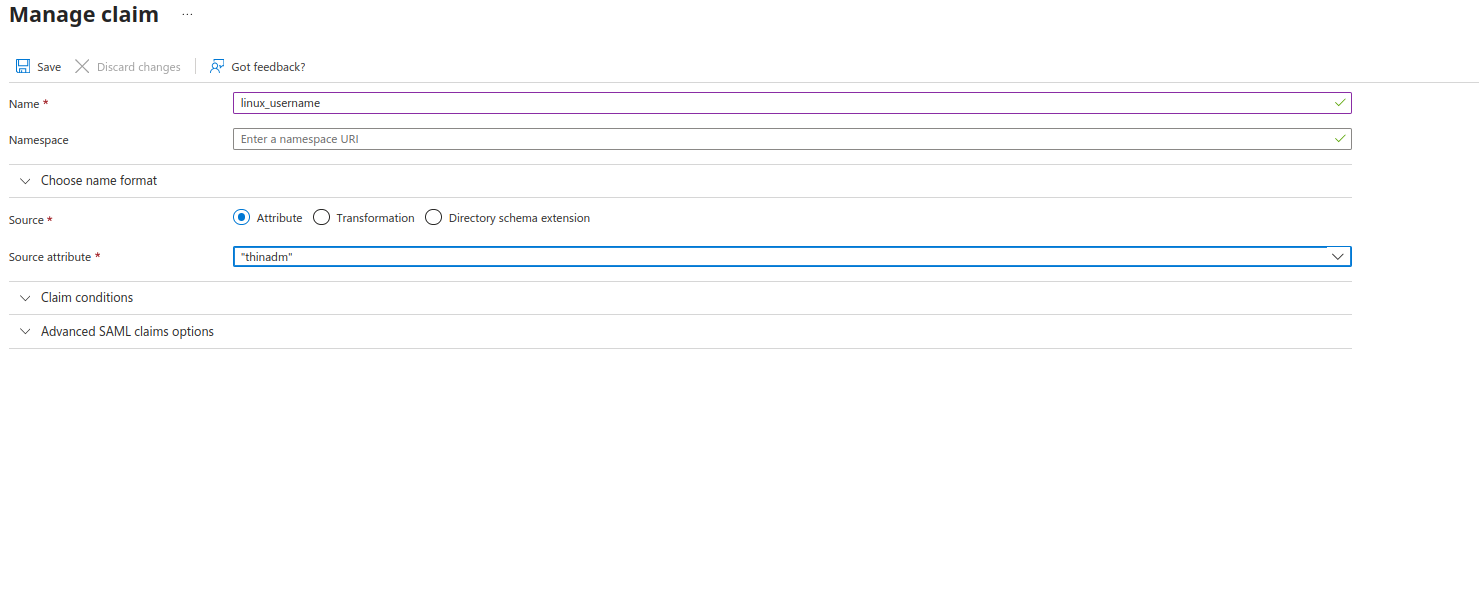
Configure the claim with all required values and click Save.
Note: The linux_username claim normally will not appear as a property in the downloaded App Registration manifest. Claims configured under Enterprise applications → Single sign-on → Attributes & Claims are managed separately.
Step 21 - Enable acceptMappedClaims
Because the token is customized, configure the application to accept mapped claims.
Open Entra ID > App registrations > ThinLinc Web Access > Manifest > Microsoft Graph App Manifest (New)
Click Download while Microsoft Graph App Manifest (New) is selected.
Then, open the downloaded JSON file in a text editor. Change “acceptMappedClaims”: null to “acceptMappedClaims”: true and save the JSON file.
Return to the manifest page, click Upload and upload the modified JSON file.
Step 22 - Determine the Entra OIDC Discovery URL
Microsoft’s tenant-specific OIDC discovery URL follows this format:
https://login.microsoftonline.com/<TENANT_ID>/v2.0/.well-known/openid-configuration
Test it from the ThinLinc server:
curl -fsSL 'https://login.microsoftonline.com/<TENANT_ID>/v2.0/.well-known/openid-configuration' | python3 -m json.tool | head -30
A successful response includes token_endpoint, jwks_uri, supported response types, and scopes such as openid, profile, and email.
Important: Do not add ?appid=<CLIENT_ID> to ThinLinc’s discovery_url. ThinLinc 4.21.0 rejects discovery URLs containing query parameters and logs: discovery_url must not contain query parameters.
Step 23 - Store the Client Secret on the ThinLinc Server
OIDC providers are configured on the ThinLinc server so create a protected directory for the secret:
sudo install -d -m 700 -o root -g root /opt/thinlinc/etc/tlwebaccess
To avoid placing the secret directly in shell history, read it into a temporary shell variable:
read -s SECRET
Paste the Client Secret Value which you sav earlier and press Enter. Then write it to the secret file and clear the temporary variable:
printf '%s' "$SECRET" | sudo tee /opt/thinlinc/etc/tlwebaccess/microsoft_secret.txt >/dev/null
unset SECRET
Set restrictive permissions and verify only the metadata:
sudo chown root:root /opt/thinlinc/etc/tlwebaccess/microsoft_secret.txt
sudo chmod 600 /opt/thinlinc/etc/tlwebaccess/microsoft_secret.txt
sudo ls -l /opt/thinlinc/etc/tlwebaccess/microsoft_secret.txt
Security: The file must contain only the raw client secret Value. Do not add CLIENT_SECRET=, quotes, or the Secret ID.
Step 24 - Configure the Entra OIDC Provider in ThinLinc
Use ThinLinc’s tl-config utility to configure an OIDC provider named entra.
Set the username claim:
sudo /opt/thinlinc/bin/tl-config /webaccess/oidc/entra/username_claim=linux_username
Set the Microsoft Application Client ID:
sudo /opt/thinlinc/bin/tl-config /webaccess/oidc/entra/client_id=<CLIENT_ID>
Set the client secret file path:
sudo /opt/thinlinc/bin/tl-config /webaccess/oidc/entra/client_secret_path=/opt/thinlinc/etc/tlwebaccess/microsoft_secret.txt
Set the OIDC discovery URL:
sudo /opt/thinlinc/bin/tl-config '/webaccess/oidc/entra/discovery_url=https://login.microsoftonline.com/<TENANT_ID>/v2.0/.well-known/openid-configuration'
Add the profile scope:
sudo /opt/thinlinc/bin/tl-config /webaccess/oidc/entra/scope=profile
ThinLinc automatically includes the mandatory openid scope, so scope=profile adds only the extra profile scope.
Set a friendly login button label:
sudo /opt/thinlinc/bin/tl-config '/webaccess/oidc/entra/button_text=Sign in with Microsoft'
Step 25 - Verify the ThinLinc OIDC Configuration
Read back the provider configuration:
sudo /opt/thinlinc/bin/tl-config -Ra /webaccess/oidc/entra
You should see values similar to:
/webaccess/oidc/entra/button_text=Sign in with Microsoft
/webaccess/oidc/entra/client_id=<CLIENT_ID>
/webaccess/oidc/entra/client_secret_path=/opt/thinlinc/etc/tlwebaccess/microsoft_secret.txt
/webaccess/oidc/entra/discovery_url=https://login.microsoftonline.com/<TENANT_ID>/v2.0/.well-known/openid-configuration
/webaccess/oidc/entra/scope=profile
/webaccess/oidc/entra/username_claim=linux_username
Step 26 - Restart ThinLinc Web Access
Restart the service and check its status:
sudo systemctl restart tlwebaccess
sudo systemctl status tlwebaccess --no-pager
You should see Active: active (running). ThinLinc Web Access listens on port 300 internally, while Nginx exposes it publicly on HTTPS port 443.
Step 27 - Test Microsoft Entra Login
Open a private or incognito browser window and browse to: https://thinlinc.linuxbuz.com.
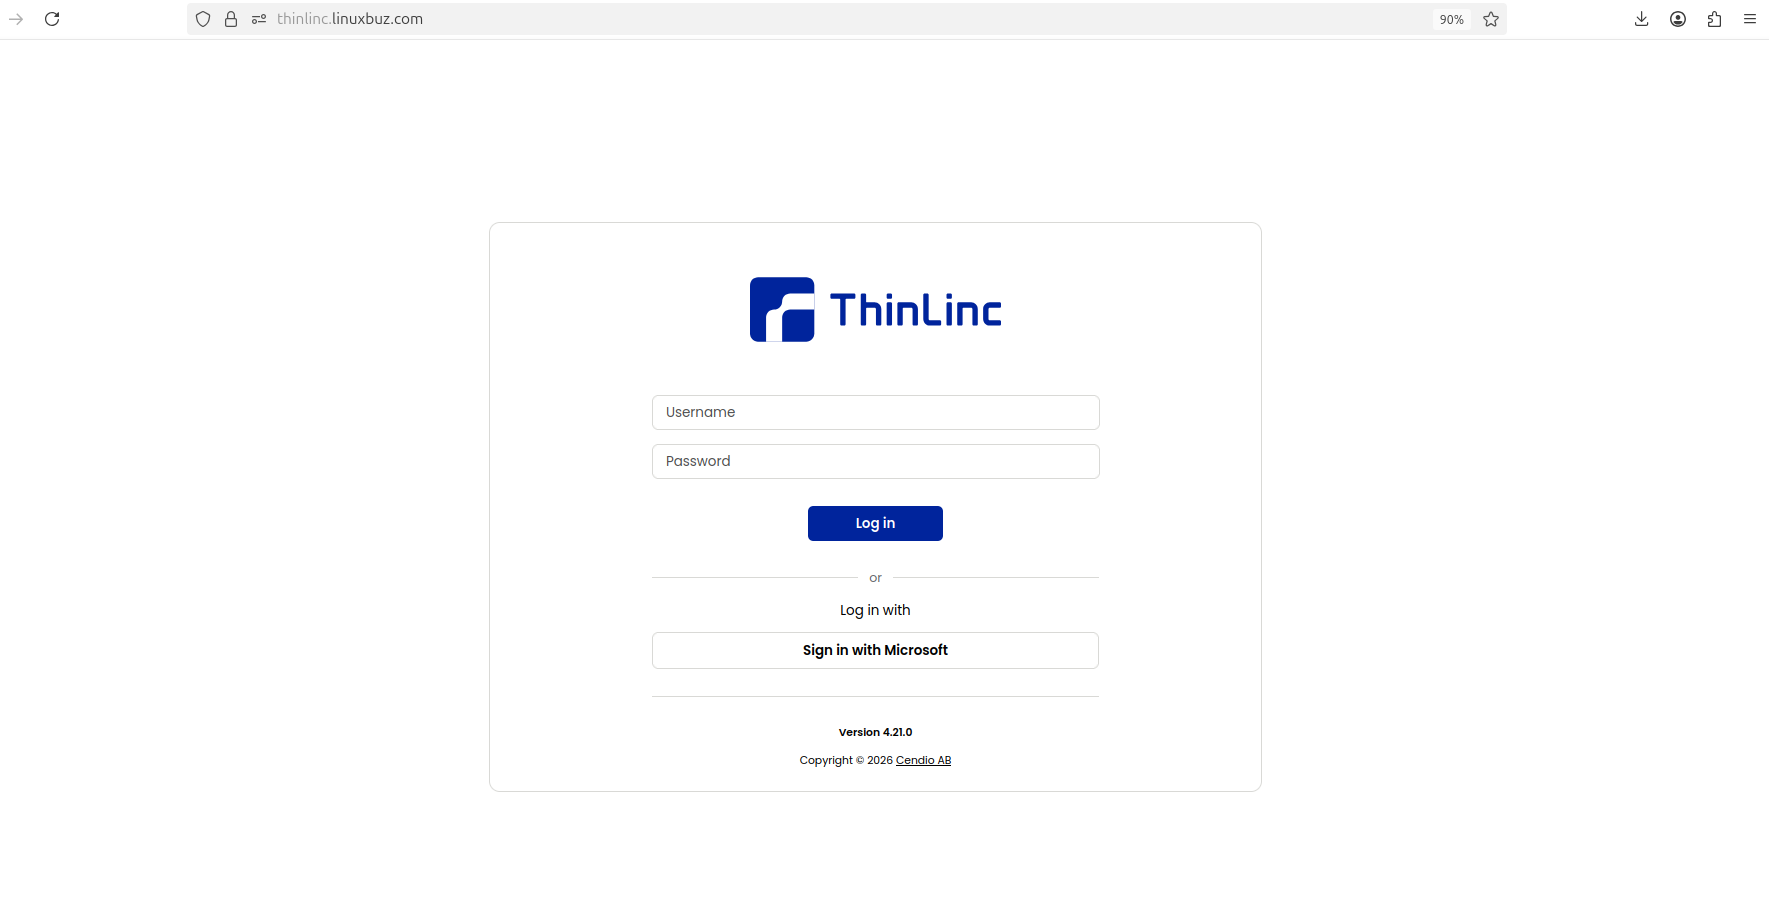
Click Sign in with Microsoft button. You will be redirected to the Microsoft login page.
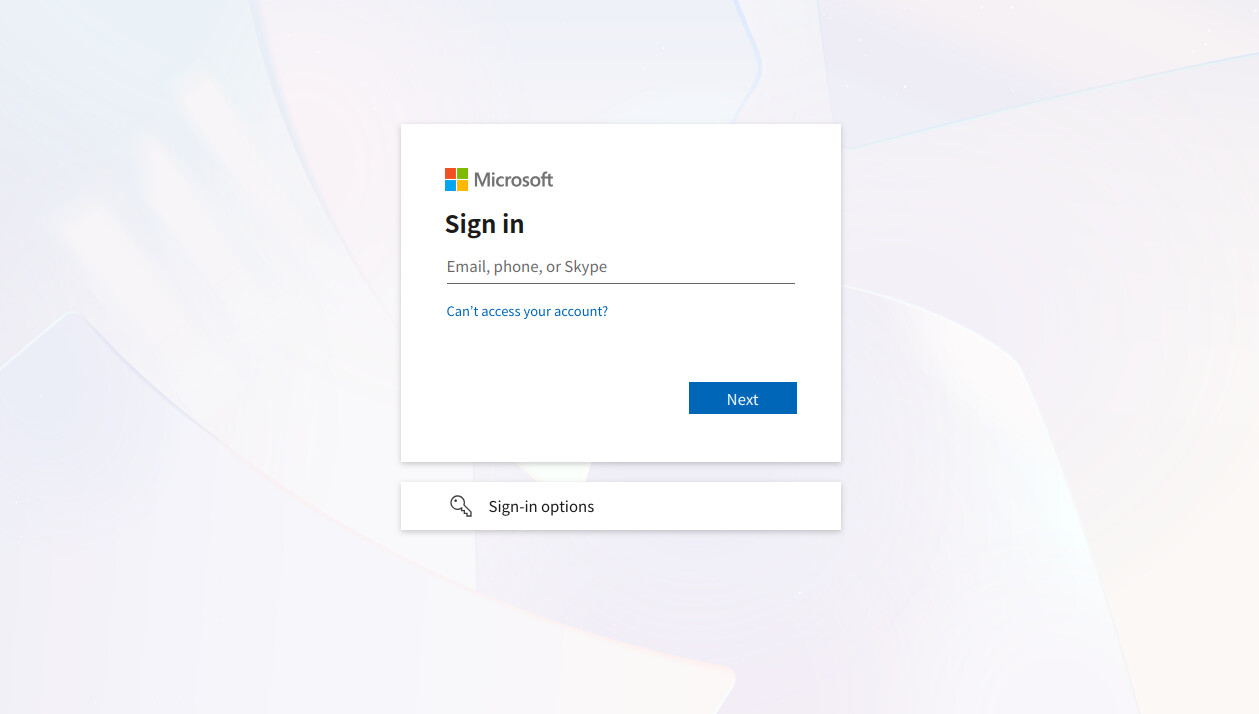
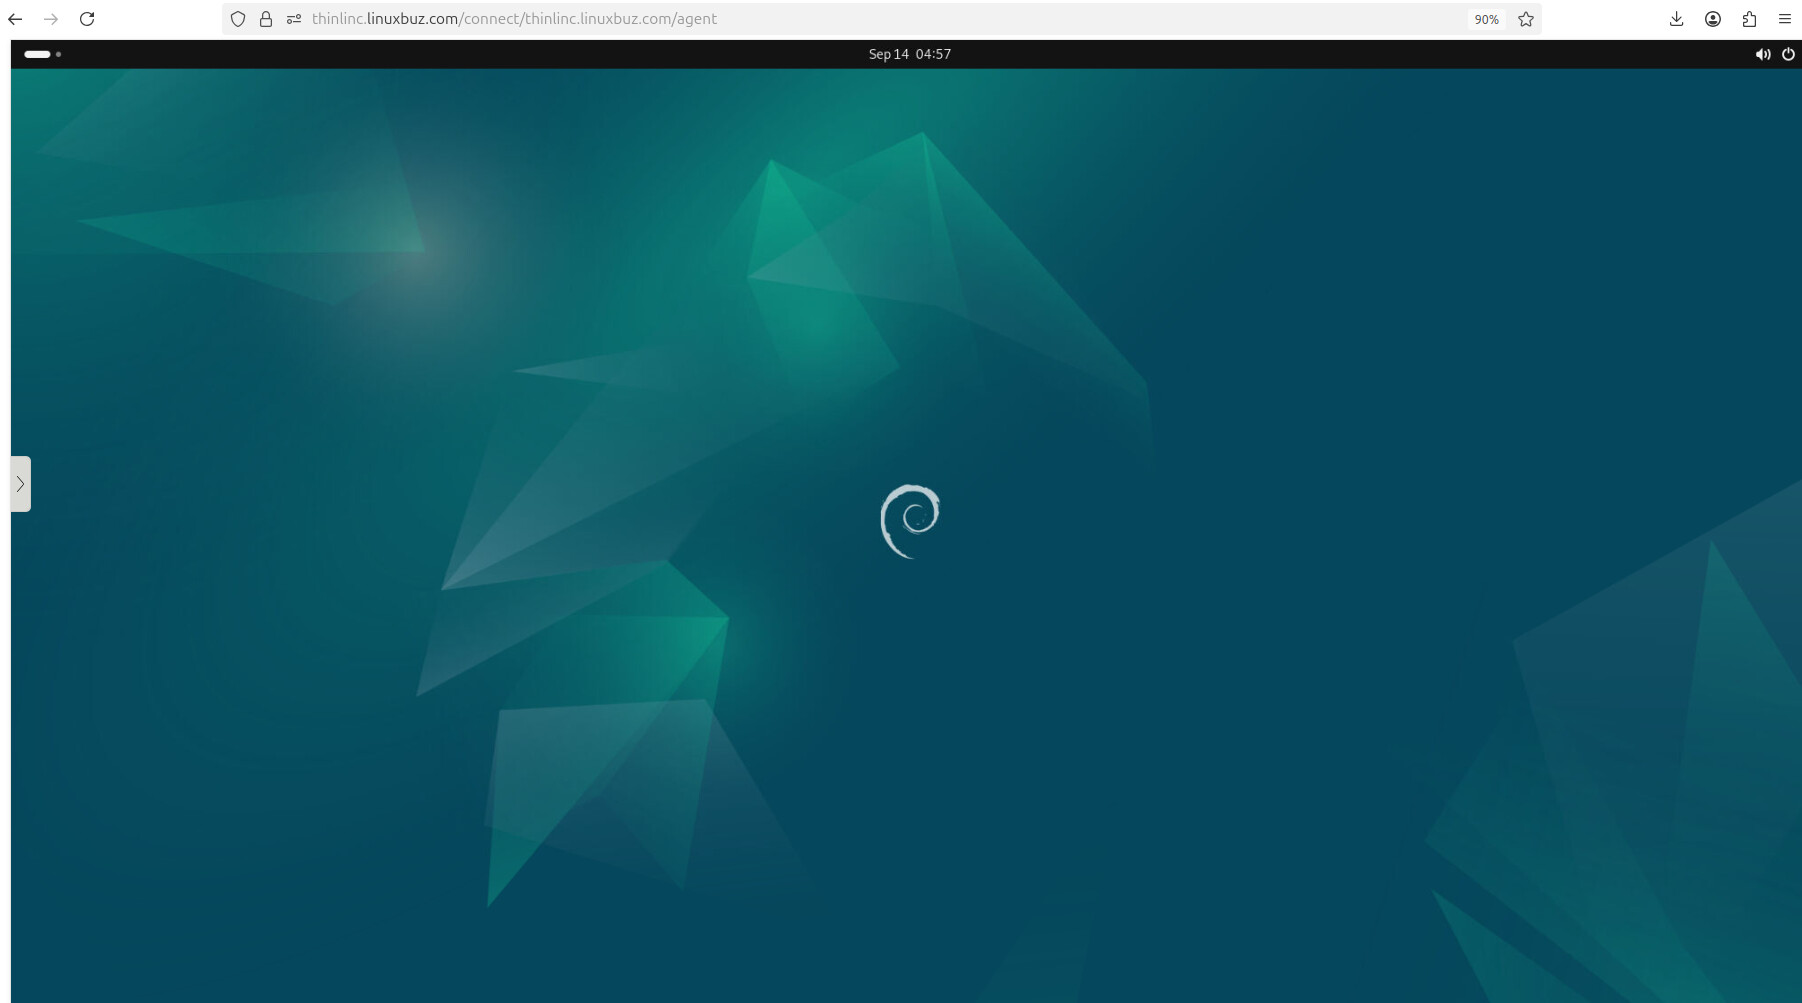
Log in with your Microsoft credentials, and you will be redirected to the ThinLinc desktop screen.
Conclusion
You now have a single-server ThinLinc 4.21.0 deployment on Ubuntu 24.04 that is published at https://thinlinc.linuxbuz.com through Nginx and HTTPS, with Microsoft Entra ID configured as an OIDC identity provider.